
废话不多说,直接上过程了。
创建根CA
- 生成CA私钥,长度4096位,并进行AES256加密
mkdir certs
cd certs/
openssl genrsa -aes256 -out ca.key 4096
chmod 400 ca.key
修改私钥为root用户只读,
openssl rsa -noout -text -in ca.key可查看创建的私钥文件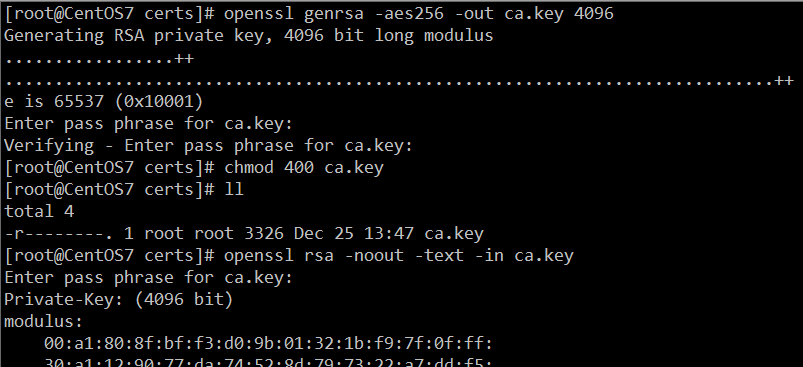
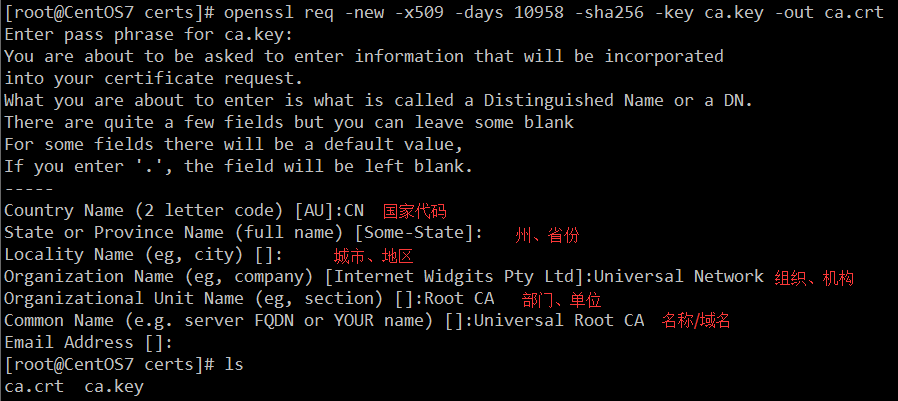
- 使用CA私钥自己签署CA证书,期限30年,采用SHA256加密(默认也是SHA256),会要求输入CA私钥密码,然后会要求填写组织信息
openssl req -new -x509 -days 10958 -sha256 -key ca.key -out ca.crt
如不想一步步填写,也可使用命令直接生成
date -s 11:59:59 ; openssl req -new -x509 -days 10958 -sha256 -key ca.key -out ca.crt -subj "/C=CN/O=Universal Network/OU=Root CA/CN=Universal Root CA" -extensions v3_ca
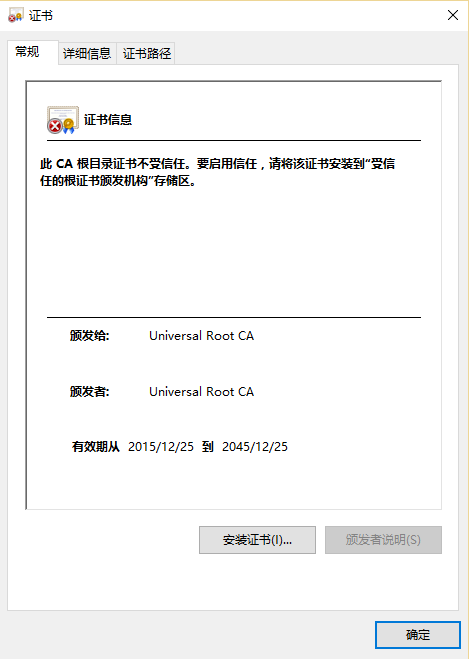
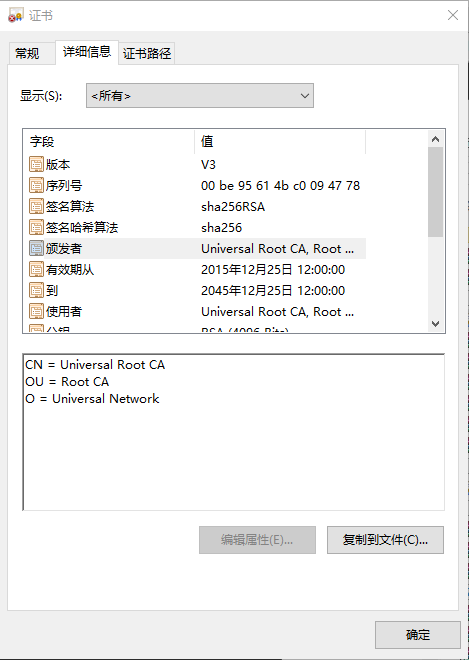
CA证书生成完毕后,可在Windows端直接打开查看证书:
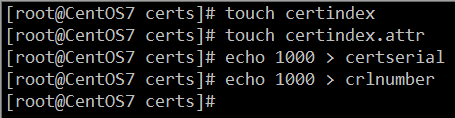
- 创建CA存储序列文件
touch certindex
touch certindex.attr
echo 1000 > certserial
echo 1000 > crlnumber
- 创建CA配置文件,该文件有CRL和OCSP末端存根,以签发中级CA证书。
vim ca.conf
# CA Configure File

[ ca ]
default_ca              = myca

[ crl_ext ]
issuerAltName           = issuer:copy
authorityKeyIdentifier  = keyid:always
[ myca ]
dir                     = .
new_certs_dir           = $dir
unique_subject          = no
certificate             = $dir/ca.crt
database                = $dir/certindex
private_key             = $dir/ca.key
serial                  = $dir/certserial
crlnumber               = $dir/crlnumber
default_days            = 730
default_crl_days        = 730
default_md              = sha256
policy                  = myca_policy
x509_extensions         = myca_extensions

[ myca_policy ]
countryName             = optional
stateOrProvinceName     = optional
localityName            = optional
organizationName        = supplied
organizationalUnitName  = optional
commonName              = supplied
emailAddress            = optional

[ myca_extensions ]
basicConstraints        = critical,CA:TRUE,pathlen:0
keyUsage                = critical,any
subjectKeyIdentifier    = hash
authorityKeyIdentifier  = keyid:always,issuer
keyUsage                = digitalSignature,keyEncipherment,cRLSign,keyCertSign
extendedKeyUsage        = serverAuth ,clientAuth
crlDistributionPoints   = @crl_section
subjectAltName          = @alt_names
authorityInfoAccess     = @ocsp_section
certificatePolicies     = @ev_section

[ v3_ca ]
basicConstraints        = critical,CA:TRUE,pathlen:0
keyUsage                = critical,any
subjectKeyIdentifier    = hash
authorityKeyIdentifier  = keyid:always,issuer
keyUsage                = digitalSignature,keyEncipherment,cRLSign,keyCertSign
extendedKeyUsage        = serverAuth ,clientAuth
crlDistributionPoints   = @crl_section
subjectAltName          = @alt_names
authorityInfoAccess     = @ocsp_section
certificatePolicies     = @pl_section

[ alt_names ]
DNS.0   = Universal Intermidiate CA
DNS.1   = Universal CA Intermidiate

[ crl_section ]
URI.0   = http://pki.example.com/UniversalRoot.crl
URI.1   = http://pki2.example.com/UniversalRoot.crl

[ ocsp_section ]
caIssuers;URI.0 = http://pki.example.com/UniversalRoot.crt
caIssuers;URI.1 = http://pki2.example.com/UniversalRoot.crt
OCSP;URI.0      = http://pki.example.com/ocsp/
OCSP;URI.1      = http://pki2.example.com/ocsp/

[ pl_section ]
policyIdentifier        = X509v3 Any Policy
CPS           = http://pki.example.com/cps/
userNotice    = @pl_notice

[ pl_notice ]
explicitText    = "This is an Certificate From Universal Root CA"


创建中级CA
- 生成中级CA私钥
openssl genrsa -out intermediate1.key 4096
chmod 400 intermediate1.key

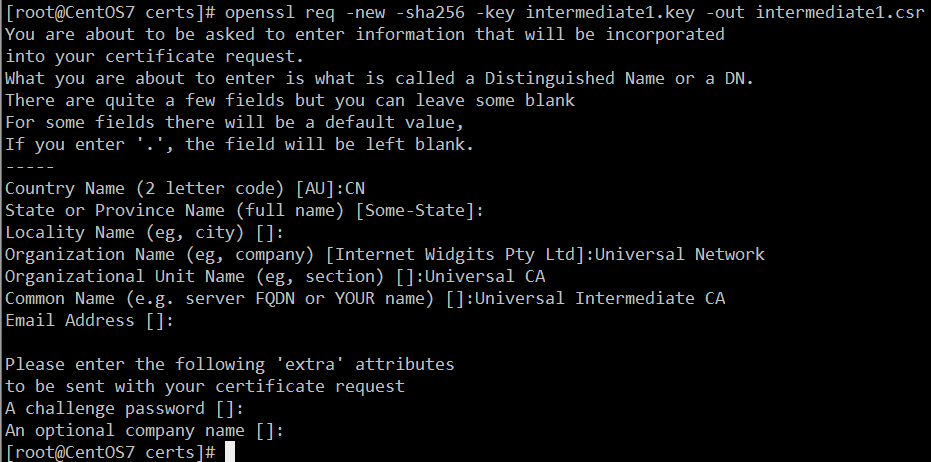
- 生成CSR证书申请凭证
openssl req -new -sha256 -key intermediate1.key -out intermediate1.csr
同样,也可使用一步生成:
openssl req -new -sha256 -key intermediate/intermediate.key -out intermediate/intermediate.csr -subj "/C=CN/O=Universal Network/OU=Universal CA/CN=Universal Intermidiate CA/"
确保中级CA的名称(CN ,Common Name)与根CA不同名
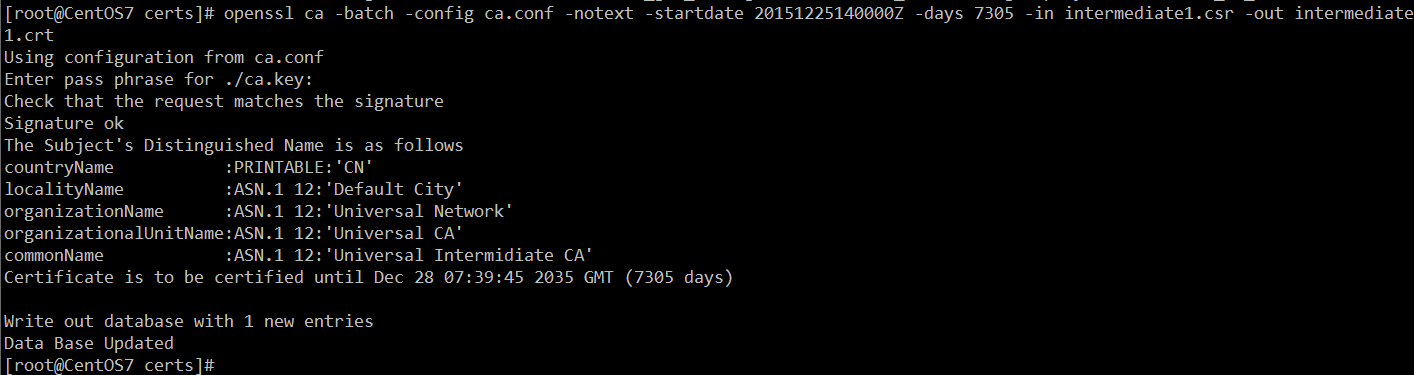
- 使用根CA签署中级CA的CSR,设置有有效期20年启用时间为2015年12月25日20时,并生成证书
openssl ca -batch -config ca.conf -notext -startdate 20151225120000Z -enddate 20351225120000Z -in intermediate1.csr -out intermediate1.crt

- 生成CRL(证书吊销列表)(包括PEM和DER两种格式)
openssl ca -config ca.conf -gencrl -keyfile ca.key -cert ca.crt -out ca.crl.pem
openssl crl -inform PEM -in ca.crl.pem -outform DER -out ca.crl

每次使用该 CA 签名、撤销证书后都需要生成 CRL。
如果需要的话,你可以撤销这个中级证书:openssl ca -config ca.conf -revoke intermediate1.crt -keyfile ca.key -cert ca.crt


配置中级CA
可在别的机器上操作,有中级CA证书和私钥即可
- 创建新目录,并将中级CA的证书和私钥放入
mkdir intermediate1
cd intermediate1/
cp ../intermediate1.key .
cp ../intermediate1.crt .

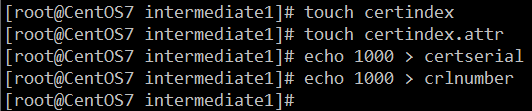
- 创建索引文件
touch certindex
touch certindex.attr
echo 1000 > certserial
echo 1000 > crlnumber
- 创建ca.conf配置文件
vim ca.conf
# Intermidiate CA Configure File
[ ca ]
default_ca              = myca
oid_section             = new_oids

[ new_oids ]
businessCategory        = 2.5.4.15
streetAddress           = 2.5.4.9
stateOrProvinceName     = 2.5.4.8
countryName             = 2.5.4.6
jurisdictionL           = 1.3.6.1.4.1.311.60.2.1.1
jurisdictionST          = 1.3.6.1.4.1.311.60.2.1.2
jurisdictionC           = 1.3.6.1.4.1.311.60.2.1.3
[ crl_ext ]
issuerAltName           = issuer:copy
authorityKeyIdentifier  = keyid:always

[ myca ]
dir             = .
new_certs_dir   = $dir
unique_subject  = no
certificate     = $dir/intermediate1.crt
database        = $dir/certindex
private_key     = $dir/intermediate1.key
serial          = $dir/certserial
default_days    = 730
default_md      = sha256
policy          = myca_policy
x509_extensions = myca_extensions
crlnumber       = $dir/crlnumber
default_crl_days = 730

[ myca_policy ]
jurisdictionC           = optional
jurisdictionST          = optional
jurisdictionL           = optional
businessCategory        = optional
serialNumber            = optional
countryName             = optional
stateOrProvinceName     = optional
localityName            = optional
organizationName        = supplied
organizationalUnitName  = optional
commonName              = supplied
emailAddress            = optional

[ myca_extensions ]
basicConstraints        = critical,CA:FALSE
keyUsage                = critical,any
subjectKeyIdentifier    = hash
authorityKeyIdentifier  = keyid:always,issuer
keyUsage                = digitalSignature,keyEncipherment
extendedKeyUsage        = serverAuth
crlDistributionPoints   = @crl_section
subjectAltName          = @alt_names
authorityInfoAccess     = @ocsp_section
certificatePolicies     = @pl_section

[ alt_names ]
DNS.0   = example.com
DNS.1   = *.example.com

[ crl_section ]
URI.0   = http://pki.example.com/intermediate1.crl
URI.1   = http://pki2.example.com/intermediate1.crl

[ ocsp_section ]
caIssuers;URI.0 = http://pki.example.com/intermediate1.crt
caIssuers;URI.1 = http://pki2.example.com/intermediate1.crt
OCSP;URI.0      = http://pki.example.com/ocsp/
OCSP;URI.1      = http://pki2.example.com/ocsp/

[ pl_section ]
policyIdentifier      = 2.16.840.1.114412.2.1
CPS             = http://pki.example.com/cps/
userNotice      = @pl_notice

[ pl_notice ]
explicitText    = "This is an Certificate From Universal Intermidiate CA"
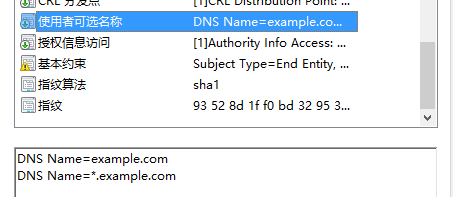
修改 [alt_names] 小节为你所需的替代可选名称,这个在创建CSR申请文件中也可以通过添加选项来实现。如果不需要就删除或注释引入它的 subjectAltName = @alt_names 行。其对应证书中的:
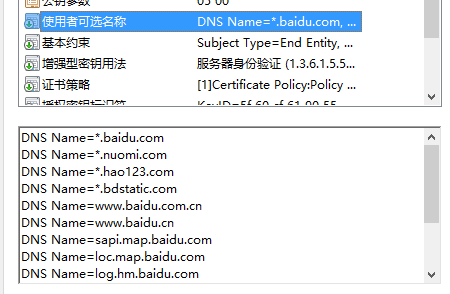
下面这个是百度证书中的:
- 生成空的CRL(证书吊销列表):
openssl ca -config ca.conf -gencrl -keyfile intermediate1.key -cert intermediate1.crt -out intermediate1.crl.pem
openssl crl -inform PEM -in intermediate1.crl.pem -outform DER -out intermediate1.crl


创建最终用户证书
我们使用新的中级 CA 来生成最终用户的证书。为此,每个你需要用此 CA 签名的最终用户证书都需要重复这些步骤。
mkdir enduser-certs
cd enduser-certs/

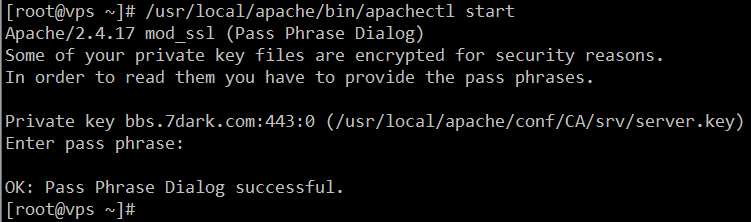
- 生成终端用户私钥文件,如果加密私钥,启动相应服务时会提示需要输入密码后方能启动,如图:
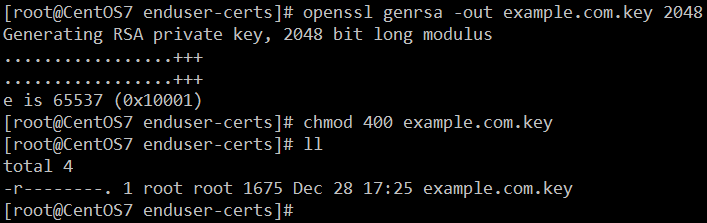
openssl genrsa -out example.com.key 2048
chmod 400 example.com.key
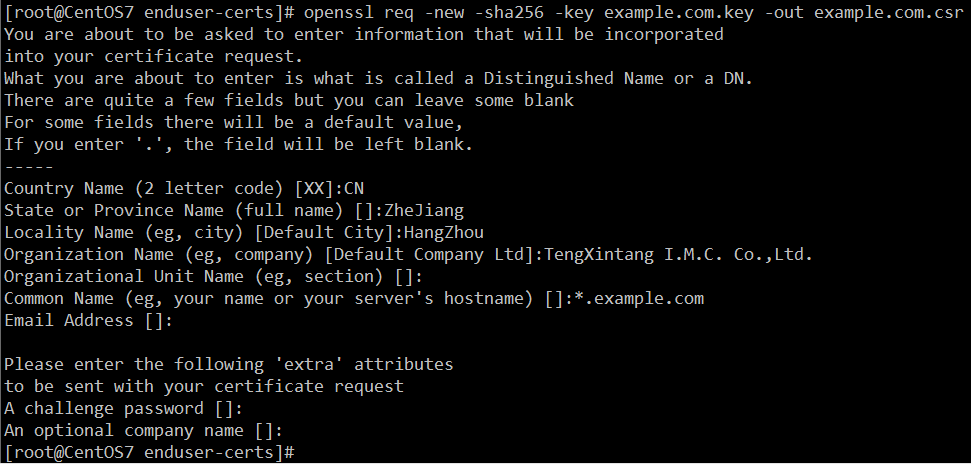
- 使用私钥生成证书申请凭证CSR,填写相关资料
openssl req -new -sha256 -key example.com.key -out example.com.csr
也可直接使用命令一步生成
cd ../ intermediate1openssl req -new -key ../enduser-certs/example.com.key -out ../enduser-certs/example.com.csr -subj "/ jurisdictionC=CN/jurisdictionST=ZheJiang/businessCategory=Private Organization/serialNumber=`cat crlnumber`/C=CN/ST=ZheJiang/L=HangZhou/O=Tengxintang I.M.C. Co., Ltd./CN=example.com /subjectAltName=DNS.1=example.com,DNS.2=*.example.com/"
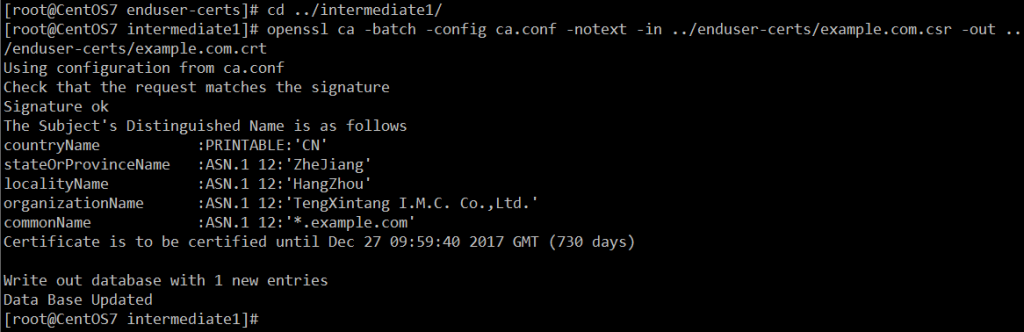
- 使用1号中级CA签署申请请求,生成证书,使用配置文件默认期限2年
cd ../intermediate1/
openssl ca -batch -config ca.conf -notext -in ../enduser-certs/example.com.csr -out ../enduser-certs/example.com.crt
- 生成CRL(证书吊销列表):
openssl ca -config ca.conf -gencrl -keyfile intermediate1.key -cert intermediate1.crt -out intermediate1.crl.pem
openssl crl -inform PEM -in intermediate1.crl.pem -outform DER -out intermediate1.crl
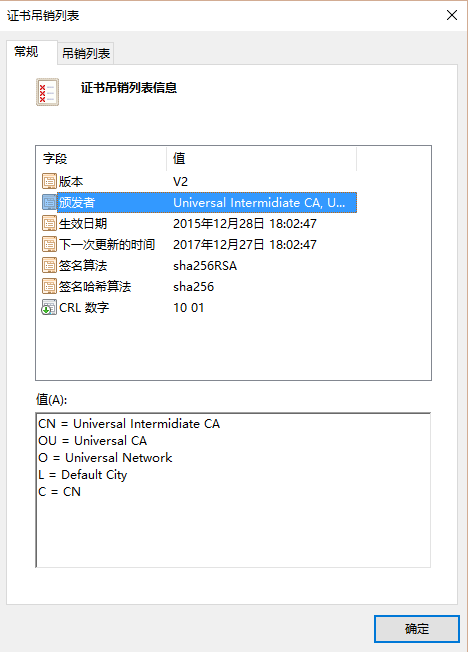
 每次使用该 CA 签名或吊销证书之后都需要生成 CRL。查看证书吊销列表,因为没有吊销的证书,所以是空的:
- 将根证书和中级证书连起来创建证书链文件
cat ../ca.crt intermediate1.crt > ../enduser-certs/example.com.chain

- 将这些文件发送给最终用户即可
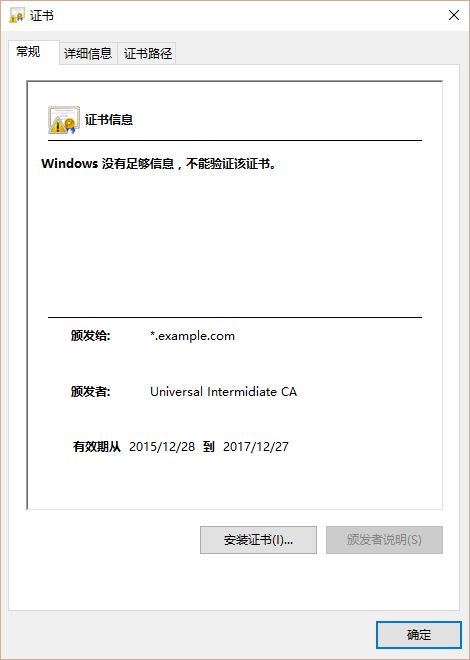
 你也可以让最终用户提供他们中级的 CSR 文件,而只发回给他们 这个 .crt 文件。不要从服务器上删除它们,否则就不能撤销了。证书创建完成,查看为:
- 如果需要的话,可以撤销这个最终用户证书
openssl ca -config ca.conf -revoke ../enduser-certs/example.com.crt -keyfile intermediate1.key -cert intermediate1.crt
openssl ca -config ca.conf -gencrl -keyfile intermediate1.key -cert intermediate1.crt -out intermediate1.crl.pemopenssl crl -inform PEM -in intermediate1.crl.pem -outform DER -out intermediate1.crl
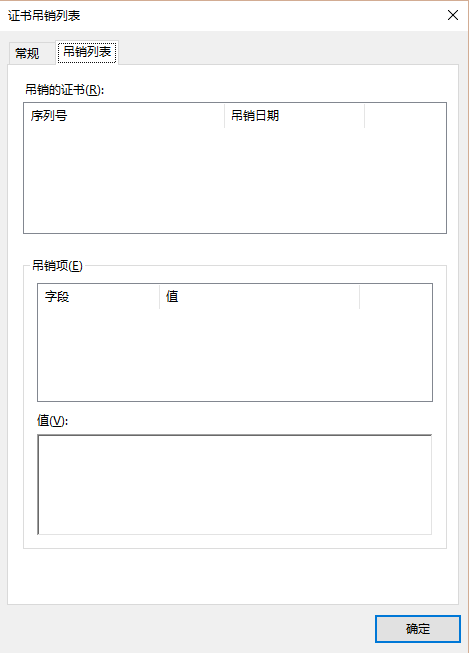
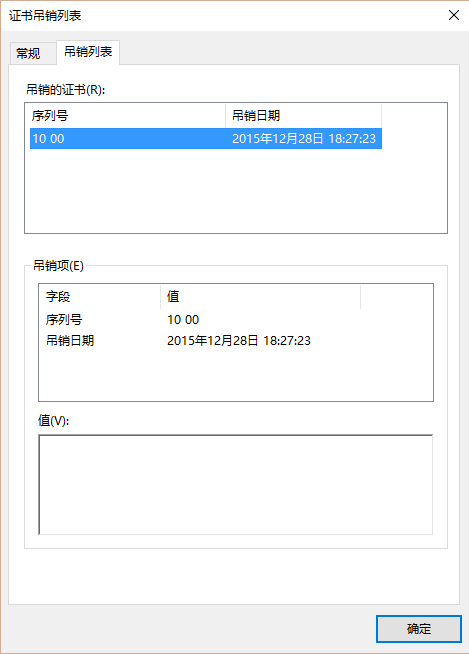
再查看证书吊销列表,就可以看到此项目了
- 检验证书
cd ../enduser-certs/
openssl verify -CAfile example.com.chain example.com.crt

也可以用 CRL 来校验它。首先将 PEM CRL 连接到证书链文件:cat ../ca.crt ../intermediate1/intermediate1.crt ../intermediate1/intermediate1.crl.pem > example.com.crl.chain

校验:openssl verify -crl_check -CAfile example.com.crl.chain example.com.crt

可以看到,因为上一步的操作,这个证书被吊销了;正常的情况下会显示OK字样
可将相应的CA证书和CRL列表放到pki.example.com网站下。


上面即为OpenSSL作为证书颁发机构生成证书过程。Apache使用证书添加多个SSL站点我会在后面的文章中发布。