
概述
简介
Elasticsearch是与名为Logstash的数据收集和日志解析引擎以及名为Kibana的分析和可视化平台一起开发的。这三个产品被设计成一个集成解决方案,称为“Elastic Stack”(以前称为“ELK stack”)。
Elasticsearch是一个基于Lucene库的搜索引擎。它提供了一个分布式、支持多租户的全文搜索引擎,具有HTTP Web接口和无模式JSON文档。Elasticsearch是用Java开发的,并在Apache许可证下作为开源软件发布。官方客户端在Java、.NET(C#)、PHP、Python、Apache Groovy、Ruby和许多其他语言中都是可用的。根据DB-Engines的排名显示,Elasticsearch是最受欢迎的企业搜索引擎,其次是Apache Solr,也是基于Lucene。
Elasticsearch可以用于搜索各种文档。它提供可扩展的搜索,具有接近实时的搜索,并支持多租户。”Elasticsearch是分布式的,这意味着索引可以被分成分片,每个分片可以有0个或多个副本。每个节点托管一个或多个分片,并充当协调器将操作委托给正确的分片。再平衡和路由是自动完成的。“相关数据通常存储在同一个索引中,该索引由一个或多个主分片和零个或多个复制分片组成。一旦创建了索引,就不能更改主分片的数量。
接下来将分三、四篇来进行补全;本篇主要写elasticsearch的群集部署。
安装
操作拓扑
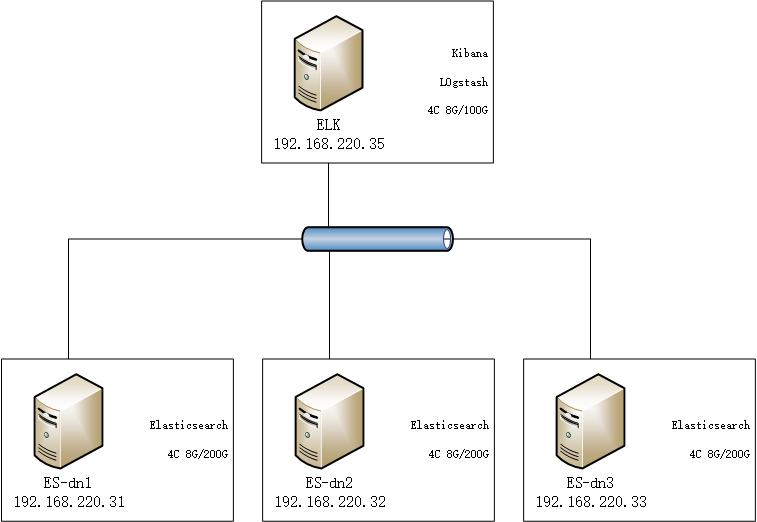
注:操作系统均为CentOS 8.5。
下载
官方下载地址:https://www.elastic.co/cn/downloads/elasticsearch。
下载中心地址:https://www.elastic.co/cn/downloads/。
目前最新的版本是 7.16.2,下载编译好的Linux二进制包即可:
wget https://artifacts.elastic.co/downloads/elasticsearch/elasticsearch-7.16.2-linux-x86_64.tar.gz
注:此二进制包中自带了JDK执行环境,如不需要可在此下载不自带JDK的程序包。自带JDK版本为17:

基础环境
Master/dn1:
sed -i 's/^SELINUX=.*/SELINUX=disabled/' /etc/sysconfig/selinux
systemctl disable firewalld
systemctl stop firewalld
hostnamectl set-hostname ES-dn1
vim /etc/hosts
# Hosts File for es
# System localhost
127.0.0.1   localhost localhost.localdomain localhost4 localhost4.localdomain4
::1         localhost localhost.localdomain localhost6 localhost6.localdomain6

# ==== User Defiend Start ====
# == Members. ==
192.168.220.31     ES-dn1
192.168.220.32     ES-dn2
192.168.220.33     ES-dn3
# ==== User Defiend End ====
init 6
dn2:
sed -i 's/^SELINUX=.*/SELINUX=disabled/' /etc/sysconfig/selinux
systemctl disable firewalld
systemctl stop firewalld
hostnamectl set-hostname ES-dn2
vim /etc/hosts
# Hosts File for es
# System localhost
127.0.0.1   localhost localhost.localdomain localhost4 localhost4.localdomain4
::1         localhost localhost.localdomain localhost6 localhost6.localdomain6

# ==== User Defiend Start ====
# == Members. ==
192.168.220.31     ES-dn1
192.168.220.32     ES-dn2
192.168.220.33     ES-dn3
# ==== User Defiend End ====
init 6
dn3:
sed -i 's/^SELINUX=.*/SELINUX=disabled/' /etc/sysconfig/selinux
systemctl disable firewalld
systemctl stop firewalld
hostnamectl set-hostname ES-dn3
vim /etc/hosts
# Hosts File for es
# System localhost
127.0.0.1   localhost localhost.localdomain localhost4 localhost4.localdomain4
::1         localhost localhost.localdomain localhost6 localhost6.localdomain6

# ==== User Defiend Start ====
# == Members. ==
192.168.220.31     ES-dn1
192.168.220.32     ES-dn2
192.168.220.33     ES-dn3
# ==== User Defiend End ====
init 6
测试确保可使用主机名相互通讯。
执行环境
在所有节点上都新建运行用户及数据目录:
groupadd -g 85 es
useradd -g es -u 85 -s /sbin/nologin -d /data/es -c "Elastic Stack" -M es
mkdir -p /data/es/{elasticsearch,logs}
chown -R es:es /data/es
vim /etc/security/limits.conf
es              soft    nofile          65536
es              hard    nofile          65536
echo 'vm.max_map_count=262144' >> /etc/sysctl.conf
sysctl -p
配置程序
解压程序文件:
tar zxf elasticsearch-7.16.2-linux-x86_64.tar.gz -C /usr/local/
cd /usr/local/elasticsearch-7.16.2/
chown -R es.es config/ jdk/ logs/ modules/ plugins/
修改配置文件:
Master/ES-dn1:
sed -i 's/^#cluster\.name:.*/cluster\.name: els-cluster/1' config/elasticsearch.yml
sed -i 's/^#node\.name:.*/node\.name: ES-dn1/1' config/elasticsearch.yml
sed -i 's@^#path\.data:.*@path\.data: /data/es/elasticsearch@1' config/elasticsearch.yml
sed -i 's@^#path\.logs:.*@path\.logs: /data/es/logs@1' config/elasticsearch.yml
sed -i 's/^#network\.host:.*/network\.host: 0\.0\.0\.0/1' config/elasticsearch.yml
sed -i 's/^#discovery\.seed_hosts:.*/discovery\.seed_hosts: \["ES-dn2","ES-dn3"\]/1' config/elasticsearch.yml
sed -i 's/^#cluster\.initial_master_nodes:.*/cluster\.initial_master_nodes: \["ES-dn1"\]/1' config/elasticsearch.yml
sed -i '$a node\.master: true' config/elasticsearch.yml
grep -Ev "^$|^#" config/elasticsearch.yml
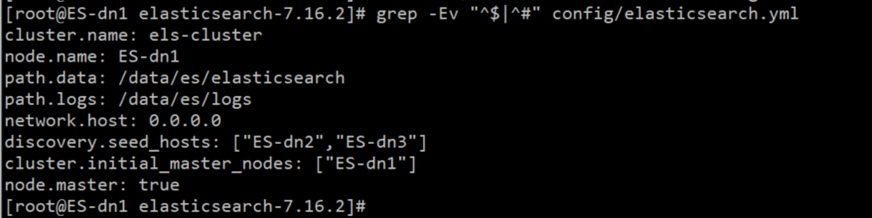
| 配置项 | 说明 |
| cluster.name | 指定es集群名 |
| node.name | 指定当前es节点名 |
| path.data | 数据保存目录 |
| path.logs | 日志保存目录 |
| network.host | 监听地址,默认 127.0.0.1 |
| discovery.seed_hosts | 启动当前es节点时会去这个ip列表中去发现其他节点,此处不需配置自己节点的ip,这里支持ip和ip:port形式,不加端口号使用ip:9300;默认 [“127.0.0.1”, “[::1]”]。 |
| cluster.initial_master_nodes | 可选举作为master节点初始的节点名称,以逗号分隔 |
| node.master | 指定是否可作为master节点; true 是 false 否 |
| node.data | 指定是否可作为 数据 节点;true 是 false 否 |
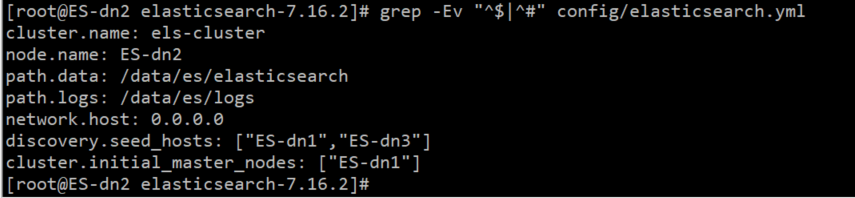
ES-dn2:
sed -i 's/^#cluster\.name:.*/cluster\.name: els-cluster/1' config/elasticsearch.yml
sed -i 's/^#node\.name:.*/node\.name: ES-dn2/1' config/elasticsearch.yml
sed -i 's@^#path\.data:.*@path\.data: /data/es/elasticsearch@1' config/elasticsearch.yml
sed -i 's@^#path\.logs:.*@path\.logs: /data/es/logs@1' config/elasticsearch.yml
sed -i 's/^#network\.host:.*/network\.host: 0\.0\.0\.0/1' config/elasticsearch.yml
sed -i 's/^#discovery\.seed_hosts:.*/discovery\.seed_hosts: \["ES-dn1","ES-dn3"\]/1' config/elasticsearch.yml
sed -i 's/^#cluster\.initial_master_nodes:.*/cluster\.initial_master_nodes: \["ES-dn1"\]/1' config/elasticsearch.yml
grep -Ev "^$|^#" config/elasticsearch.yml
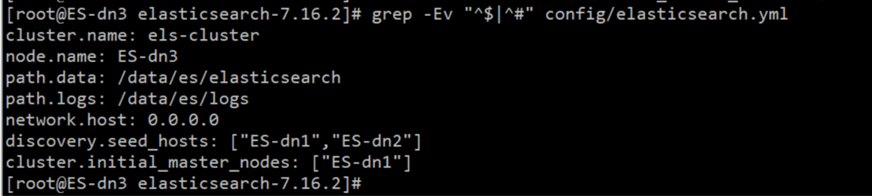
ES-dn3:
sed -i 's/^#cluster\.name:.*/cluster\.name: els-cluster/1' config/elasticsearch.yml
sed -i 's/^#node\.name:.*/node\.name: ES-dn3/1' config/elasticsearch.yml
sed -i 's@^#path\.data:.*@path\.data: /data/es/elasticsearch@1' config/elasticsearch.yml
sed -i 's@^#path\.logs:.*@path\.logs: /data/es/logs@1' config/elasticsearch.yml
sed -i 's/^#network\.host:.*/network\.host: 0\.0\.0\.0/1' config/elasticsearch.yml
sed -i 's/^#discovery\.seed_hosts:.*/discovery\.seed_hosts: \["ES-dn1","ES-dn2"\]/1' config/elasticsearch.yml
sed -i 's/^#cluster\.initial_master_nodes:.*/cluster\.initial_master_nodes: \["ES-dn1"\]/1' config/elasticsearch.yml
grep -Ev "^$|^#" config/elasticsearch.yml
其它配置:
根据机器环境,适当修改JVM内存大小:
vim config/jvm.options
-Xms2g
-Xmx2g
注:官网建议这两个值设置为相同,官网建议此值不要超过物理内存的 50%,因为还有其它事务还需额外内存,详写官网说明。